
When the temperature drops and morning puddles turn into a crisp, crackling mirror, it’s the perfect moment for a little winter magic. Grab some water, a piece of string, and a few natural treasures you collected on a walk, and make your very own ice ornament. Depending on the weather, you can then observe it throughout the day—or even for several days—and watch how it changes.
Why this is such a lovely activity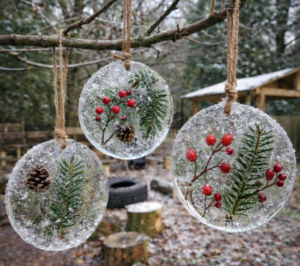
- It’s quick and inexpensive – you can find most of what you need on a walk.
- It engages the senses – children choose twigs, pine cones, berries, and explore colours and shapes.
- It’s mini science – what will the sun do? What will the wind do? When will it start to melt? Why do bubbles sometimes appear?
- It looks beautiful – just like in the photo: translucent “ice discs” with a sprig of evergreen, red berries, and a pine cone inside, hanging from a tree.
What you’ll need
- shallow bowls / small plates / lids from larger containers (the wider, the bigger the ornament)
- water
- string or jute twine (it looks great outdoors, too)
- “nature treasures”: pine needles, small twigs, pine cones, dried flowers, berries, leaves
Exact step-by-step instructions (how to get the result)
1) Collect natural materials
Go for a short walk with the children and turn it into a game:
- “Find three things that are prickly.” (pine needles)
- “Find something brown that is hard.” (a pine cone)
- “Find something red.” (berries—1–2 are enough for one ornament)
2) Prepare the moulds
Place the bowls/plates on a tray or a small board (it will be easier to carry outside).
Put the natural items into each bowl—feel free to “arrange” the composition with the children beforehand.
3) Add water
Pour in water so that everything is submerged, but the ornament isn’t unnecessarily thick.
The ideal water depth is about 1–2 cm (it freezes faster and looks more delicate).
4) Add the string so it stays in place (this is key)
Make a loop with the string and leave the knotted end as it is—the knot will “catch” in the ice once frozen.
Now you have two simple options to keep the loop where it should be:
Option A – “freeze halfway” (most reliable):
- Put the bowls outside or in the freezer for 30–60 minutes, until the water starts to turn slushy.
- Then place the knot/loop into the top area where you want the hanger to be.
- Let it freeze completely.
Option B – right from the start:
- Place the loop into the water and weigh down the knot or the end of the string (for example with a small stone or a piece of pine cone) so it doesn’t float up.
- It works, but sometimes the string shifts—so Option A is more reliable.
5) Leave to freeze overnight
- Outside: place the moulds on a flat surface where they won’t get rained on / covered by very wet snow.
- In the freezer: place them on a flat shelf.
For the ornaments to hold well, it’s ideal if the temperature stays below zero for several hours in a row.
6) Unmould the ornaments in the morning
7) Hang them in a tree and observe
Hang the ornaments on branches (ideally where there’s a bit of sun and also some shade).
During the day, children can watch:
- when it starts to melt and why,
- how the transparency changes,
- whether droplets and icicles form,
- what the wind does.